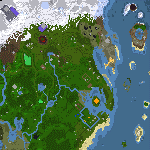
This is mainly an RPG map, I recommend it primarily for those who are eager to embark on adventures, but don't worry, there will be plenty of battles and tactics involved. You'll encounter many heroes who may join you if you wish. Solve as many quests as possible, explore as many locations as you can!
Have a great time,
Nefrit!
Author: Razorockham (Netherland), 19-04-2024 21:46 Demonologist Anita - Nefrith's Strory Nefrith's Story indeed is a real RPG map. Good story-line, no mistakes. I played on champion level, but even with more easier levels this map is far from 'easy'- as the maker wants us to believe. Most helpful is the hero Anita - acquire her help and her 'summon imps' spell as soon as possible. Develop all seven heroes in one particular way, for instance Grandmster Life with the spell Divine Intervention. Grandmaster Order I did not reach, so I could not use the (annoying)spell Hypnotize. I did not travel by sea, to dig up the hidden artifact. Inj the end Anita was level 20, the others were lower level. All in all: very good!
Nefrith's Strory walkthrough
Nefrith's Story Walkthrough
Hi!
In the map Nefrith's Story there are some situations, where the path leading forward is not too straightforward, so I'm writing this walkthrough to help You ou in those situations.
WARNING!
The walkthrough contains spoilers of the map, only read if you're REALLY stuck!
This is only the walkthrough of the main quest, if you are stuck with one of the side quests, feel free to ask in the comments.
After starting the map you head west, go to the place named Silent Walley, and interact with the quest hut. That'll give you your main quest. You'll have to find 3 artifacts; The Armor of Life, the Badge of Courage, and the Crusader's Mace.
To get the Armor of Life you head further west, on the way you'll meet Limona, the first recruitable Hero. It's important, to accept ALL THE SIX recruitable heroes because you can pass the final gate only if you have all the possible heroes in your army.
You continue your journey west and enter the area named Troll Swamps. At the westernmost part of Troll Swamps, you'll have to fight some Hydras to get the Armor of Life.
After you get the Armor you get your second bunch of Pikemen, with Nefrith you cross the bridge, and go northwest. You'll see a purple portal, you enter it and go to the location named "Shadow Mountains".
You'll see that the road westward is blocked, so you have two options left. You can go after the Crusader's Mace or the Badge of Courage.
To get the Badge of Courage, (it's more practical to do this first, but it's on you) you head north. You'll find a Haven town and an Order town. You have to interact with the quest guard in front of the Haven town, that will delete the obstacles blocking the quest guard of the Order town. You interact with that as well, and that'll delete the obstacles blocking the way to the underworld. The tunnel to the underworld is a few days east of the Order town. You go down, defeat the enemies, and after that, you open the quest guard of the Order town. You go in, you'll find a quest hut that wants you to pay 5000 gold for a password. You pay for it. You go to the quest guard of the Haven town, and you enter. This will clear the road in the shadow mountains, you go back there, and defeat the hero named Reewer. With that, you'll get the Badge of Courage.
For the Crusader's Mace, you need to head east. You'll find an area named Bare Lands, and at the easternmost part of it, a Might town. You capture it, and you'll get the Crusader's Mace.
After you got all the 3 of the needed artifacts, I recommend exploring the map to find the remaining heroes, and to complete the side quests. After you have all seven heroes in your army, you go back to the Silent Valley and finish the quest. That'll open the path to Wordor. You can only enter with an all-hero army with seven heroes and no creatures.
Then you need to capture Wordor, and with that congratulations, you completed the map!
I hope you'll find this walkthrough helpful, have a great time playing the map!

 Likes
Likes